Friday, 3 January 2014

Setting Photoshop as the Default Image Editor in Unity

You could use these steps to set any default image editor in Unity, you'd just have to change the file path.

Open Unity and click "Edit > Preferences" and then click on "External Tools". Click on the drop-down list next to "Image application" (labelled "Open by file extension" by default) and click "Browse".


Browse to where you installed Photoshop (it should be in the "Program Files" folder, I installed it onto my D Drive so the path is "D:\Program Files\Adobe Photoshop CC (64 Bit)") and select "Photoshop.exe" and click "Open".


"Adobe Photoshop CC" will now show in the "Image application" drop-down.


Close the Preferences window and now all image files will open in Photoshop.

Setting Visual Studio 2013 as the Default Editor for Unity

With our registration to BizSpark now complete it was time to take advantage of getting Visual Studio 2013 Ultimate for free and use it for the editor instead of MonoDevelop. I find that the autocomplete function in MonoDevelop doesn't always work as well as expected, so using VS may be better.

This integration opens scripts in Visual Studio, if you want better integration than that, then you want to look at UnityVS. If you're an Indie with 4 or less employees, then UnityVS is just $99. You can find out about their pricing here.

Open up Unity and click "Edit > Preferences" and then click on "External Tools".


Click on the drop-down list next to "External Script Editor" (it shows "MonoDevelop (built-in)" by default) and select "Browse". Visual Studio is an x86 application, so it will be in your "Program Files (x86)" if you are using a 64bit OS, or just "Program Files" if you're using a 32-bit OS.  I installed Visual Studio on my D Drive (on a machine running Windows 8.1 64-bit), so the path to it is:

D:\Program Files (x86)\Microsoft Visual Studio 12.0\Common7\IDE


Select the "Application" "devenv.exe" and click "Open".The drop-down list will now show as "Microsoft Visual Studio 2013" so close the Preferences window and the next time you open a script in Unity, then it will open in Visual Studio 2013.


Saturday, 30 November 2013

Notes on Terrain Sculpting in Unity

So a couple of weeks ago I watched the Terrain Sculpting video tutorial from Unity, which you can view here:

http://unity3d.com/learn/tutorials/modules/beginner/live-training-archive/terrain-sculpting

But one of the questions I had was: what if you want to sculpt valleys, etc., using a height map?

To be able to sculpt valleys and troughs within Unity you have to Flatten your terrain. It sounds odd, I know, but in the tutorial you set a height greater than 0 and hit Flatten. This raises your terrain to the height you specified and allows you to cut into your terrain.

To Flatten your terrain, select it, then click on the "Paint Height" button in the Inspector. You will see the Flatten button in the Brush Settings (highlighted in red below) and you can either use the slider or type right into the box. Once you have your desired height set, then click "Flatten".


If you click the "Raise/Lower Height" button you can hold the Shift key while painting and you will cut into your Terrain.

But what if you want to use a Height Map? Well you can. Flatten your image and then click on the Settings button (illustrated below).


 Then click "Import Raw" under Height Map.

 
Choose your file and your height map will be applied. I created my Height Map in Photoshop and it looks like this:


The gray colour is: R: 176, G: 176, B: 176.

The black is: R:36, G: 36, B: 36
The texture was created in 8-bit grayscale and was saved in .RAW format.
My Terrain was 2000 x 2000 pixels, so that's how big I made the canvas.

When applied to the terrain, it looks like this:


Wednesday, 27 November 2013

Support an indie developer and get a game for free!

Exciting News!
Our friends over at Late Night Apps are doing a special promo on their awesome game Polyhegrams! The game is free from November 28th to December 1st for all Windows 8 based devices! That's right, get Polyhegrams for free on your Windows 8 laptop or desktop, Surface RT or PRO and even on your Windows Phone! Polyhegrams is a fantastic game that works out your brain as well as your fingers. Find out more at
www.polyhegrams.com.

So be thankful for Indie Developers this Thanksgiving weekend and score a free game!

Friday, 22 November 2013

A bit or an update...... or ......... "I love it when a plan comes together"

General Blurb!
Well it's been a bit quiet here on the Blog for a while. I've been getting to grips with Twitter so most of the updates have been going on there. Twitter is great at providing just a short update until I get the time to sit down and write everything out in Blog format. So, if you want more up-to-date news, then you can either Follow us on Twitter, or Like our Page on Facebook (the Twitter updates go to our Facebook page). If I had the time to sit down and work out if the Twitter feed could also go to our Google+ page, then I'd do that as well, but to be blunt: I'd rather spend my time on developing the game.

The Game
Yes, a game decision was made and I'm really excited about it! It's a survival horror game... and that's all I can say at the moment. Oh, I can say that a prototype is being developed!

Wii U
Kirkley Entertainment Inc. is now a registered Nintendo developer! Yay! That was very exciting! :D
We signed up for the Deferred Payment plan and got our Wii U Developer Kit. It was a bit of a process to receive the Dev. Kit as it got held up at border control because we didn't have an International Import number. Fortunately it was only a quick call to sort that out.
I did have an error when trying to run something on it, but the forums were a great place to get help. I managed to get up and running and had the Unity Angry Bots demo running on the Dev. Kit.

Unity
If you haven't guessed by now, Unity was chosen as the development engine going forward. I learnt a lot about it at the Unite Training Day as well as at Unite itself. You get a special Wii U version of Unity Pro when you become a Nintendo developer, so that was a bonus. Add in that Unity is compatible with PS 3 & 4 + Vita, Xbox 360 & One, Windows, Linux, Android and Apple OS's, then it makes it a one-stop shop for games development.

The Unity Asset Store
In order to develop the prototype as quickly as possible I decided to buy assets from the Unity Asset Store. Taking out the modelling component for characters (plus some great sales on the Asset Store) means I can just concentrate on developing the prototype and getting to rips with Unity and the Wii U Dev. Kit.

Unity Tutorials
Everyone needs to learn how to do stuff. Even if you've worked with a game engine before, or built one yourself, you still need to learn anything new. The Unity Tutorials have been great, and I'm especially getting a lot out of the Live Training Sessions, which are archived here:

http://unity3d.com/learn/live-training/archive

Other Tools
As a Unite attendee I got a great offer on a product called iClone. I got a bundle which included 3DExchange, the Mocap Device Platform (which allows you to use a Kinect to capture motion so you can animate in iClone) as well as training DVDs. Very handy and a great price.
Today I managed to create a custom animation in iClone and then export it using 3DExchange. Then I imported it into Unity and watched my animation play. The tutorial I followed is here:

http://www.gamasutra.com/blogs/MDMcCallum/20130926/201111/iClone_to_Unity_Tutorial.php

I also subscribed to the Adobe Creative Cloud so I can use Photoshop to create Height Maps for Unity, as well as for texture editing.

Then there's the Autodesk Entertainment Creation Suite, and Maya LT that I've been playing with. I haven't done much with these tools as I have been getting content from the Unity Asset Store.

We also got accepted for BizSpark, hence the logo on our site, which means we get awesome tools like Visual Studio 2013 Ultimate. I think that means we'll have to invest in a copy of UnityVS to take full advantage of that toolset.

Other Stuff
We put a legal firm on retainer, though that retainer was eaten up by getting them to go over our incorporation documents to make sure everything was in set up correctly, and then creating a Corporate Minute Book. The lawyer I'm working with specialises in the Technology field and Intellectual Property, so this is great!

And so it goes..
Now that the game has been selected, the engine has been selected, and the content creation tools selected work can really start to progress on the game. I'm hoping that the prototyping goes well and a basic prototype is available some time in 2014. Once that prototype is running, then I'm considering a Kickstarter campaign so I can raise some money to hire staff and really get going on this game.
I'm really excited in the progress that has been made recently, and the future is starting to look bright, so get out your shades! :)

Friday, 6 September 2013

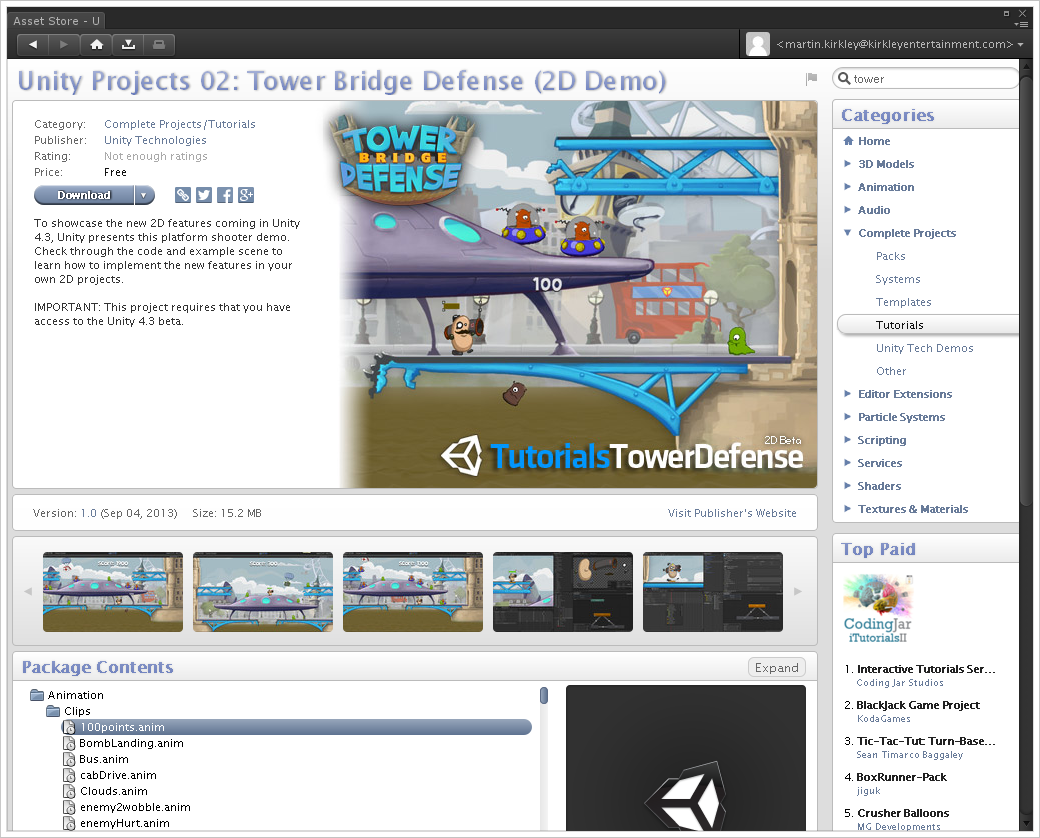
2D Demo from Unite 2013

The Tower Defense game that was used to demo the new 2D features coming in Unity 4.3 is available for Free in the Unity Asset Store!


You must have the Beta of Unity 4.3 for the Project.

Thursday, 5 September 2013

Easter Seals Part 2

Today was the day that Jennifer abseiled down one of the Sun Life buildings in Sun Life Plaza in Calgary! The buildings are all 28 accessible floors (they're actually 30 floors but the very top 2 are for building operations) and they are 114.3 meters (375ft) tall, and Jennifer abseiled down the whole thing.


We're very proud of what she accomplished and she managed to raise just short of $1,500 in only a few weeks. The money goes to the Easter Seals, which you can learn more about on their website here.


We'd just like to say a big "THANK YOU" to all of Jennifer's sponsors!