Showing posts with label Unity. Show all posts

Monday, 14 April 2014

Importing a Daz Character into Unity

We're using Daz3D 4.6 and Unity 4.2.2 (March 2014 Pro release for WiiU). We're also using iClone 5.5 with 3DExchange for animation, but this post is notes on exporting a Daz3D character and importing it direct into Unity and applying standard animations from Unity utilizing the in-built Mecanim animation engine.

You can get Daz3D for free from here: https://www.daz3d.com/get_studio
Buy Michael 6 Pro Bundle in the Content Marketplace: http://www.daz3d.com/michael-6-pro-bundle
You can get the regular version of Unity here: http://unity3d.com/unity/download
You can get iClone here: http://www.reallusion.com/iclone/
And 3DExchange is here: http://www.reallusion.com/iclone/3dx/

OK, so these notes start with Daz3D where you've created your character (we've used Michael 6 with Newport shoes, pants and sweater, blue eyes and MicahHairG2M).


Click "File > Export".


Choose a location for the exported model and name it (make sure the file type is "Autodesk FBX (*.fbx)".


Make sure the following items are selected (there have been no animations applied to the model in this case, but if there are then make sure that "Animations" is selected):

  • Figures
  • Props
  • Morphs
  • Embed Textures
  • Merge Clothing into Figure Skeleton
  • Allow Degraded Skinning
  • Allow Degraded Scaling

Then click "Accept".

Note: Make sure that "Convert Clothing to Static Geometry" is NOT selected. This option was selected by default in my installation. If this option is selected and you animate the model, then only the Michael (or whichever model you are using) character moves; the clothes stay exactly where they were when you exported them. This results in some very amusing, if not frustrating, problems.

You'll see a progress bar as the model is exported. The bar disappears when the export is complete.


Now go to Unity and go to the "Project" view. I have a folder called "Models" (or Model for some odd reason in this screenshot!) where I store all the models I import just to keep everything neat.


Open an Explorer Window, browse to the location the model was exported to, and then just drag and drop the FBX file into the Model folder in Unity. You will see a progress bar in Unity while it imports your model.


Don't worry if you see anything like this message:


It's just Unity warning you that it found too many meshes and has corrected the issue for you. Unity is awesome like that.

OK, so now the model is in the "Models" folder, but DON'T ADD IT YET! You have to edit the model first so that Unity knows how to treat it. I keep forgetting about this, then wonder why my models do crazy things when I apply Mecanim (like sink half way through the floor, or move 5 miles away in game space, or go into some bizarre bear-hug-like pose, etc., etc.). Anyway, enough of "helping you learn via my mistakes". :)

Click on the new model and then look at your "Inspector". You should see 3 buttons/tabs:

  1. Model
  2. Rig
  3. Animation

Click on "Rig" (you should be there already) and click on the drop-down list next to "Animation Type" and select "Humanoid" instead of "Generic".


Click "Apply".


You can click on the "Configure" button and make sure that the bones all line up (right thumb maps to right thumb, left leg maps to left leg, etc.) but the Daz3D models export so well that you won't need to do that.

If your character had no animations, or you chose not to export them from Daz3D, then click on the "Animations" tab and clear the check mark for "Import Animation" and click "Apply".


You'll see the "Hold On" status bar for a minute, so let Unity do its thing. Once the status bar goes away, you can add your model to your Unity Scene simply by dragging and dropping from the Project window into the Scene window.


I have a folder called "Controllers" that I put my Animation Controllers in. I created an Animation Controller called "Michael6_6" and it only contains an "Idle" state which maps to the "Idles" animation from the Unity 4 Macanim tutorial (the tutorial is here: http://youtu.be/Xx21y9eJq1U, and the assets (which include the animations) can be downloaded from here: http://files.unity3d.com/will/MecanimTute.zip).

Click on the instance of your model in the "Hierarchy" pane, then drag and drop the controller into the "Controller" slot of your model.

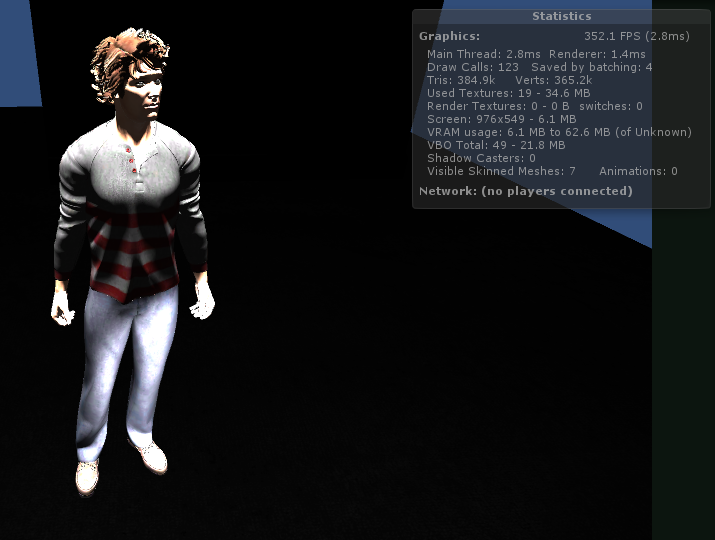
Now hit "Play" to test and you should see your character run through the Idles animation.


My scene is badly lit as I'm testing some light effects, so don't be put off by how my model looks in this screenshot. Here is our character again and he's in a brand new scene with only a floor plane and a directional light and you can see how much better he looks (also, the FPS is a lot higher).


So there you go, that's how to add a Daz3D character to Unity and use the Mecanim functionality (in Unity 4.x) to apply animation.


Friday, 3 January 2014

Setting Photoshop as the Default Image Editor in Unity

You could use these steps to set any default image editor in Unity, you'd just have to change the file path.

Open Unity and click "Edit > Preferences" and then click on "External Tools". Click on the drop-down list next to "Image application" (labelled "Open by file extension" by default) and click "Browse".


Browse to where you installed Photoshop (it should be in the "Program Files" folder, I installed it onto my D Drive so the path is "D:\Program Files\Adobe Photoshop CC (64 Bit)") and select "Photoshop.exe" and click "Open".


"Adobe Photoshop CC" will now show in the "Image application" drop-down.


Close the Preferences window and now all image files will open in Photoshop.

Setting Visual Studio 2013 as the Default Editor for Unity

With our registration to BizSpark now complete it was time to take advantage of getting Visual Studio 2013 Ultimate for free and use it for the editor instead of MonoDevelop. I find that the autocomplete function in MonoDevelop doesn't always work as well as expected, so using VS may be better.

This integration opens scripts in Visual Studio, if you want better integration than that, then you want to look at UnityVS. If you're an Indie with 4 or less employees, then UnityVS is just $99. You can find out about their pricing here.

Open up Unity and click "Edit > Preferences" and then click on "External Tools".


Click on the drop-down list next to "External Script Editor" (it shows "MonoDevelop (built-in)" by default) and select "Browse". Visual Studio is an x86 application, so it will be in your "Program Files (x86)" if you are using a 64bit OS, or just "Program Files" if you're using a 32-bit OS.  I installed Visual Studio on my D Drive (on a machine running Windows 8.1 64-bit), so the path to it is:

D:\Program Files (x86)\Microsoft Visual Studio 12.0\Common7\IDE


Select the "Application" "devenv.exe" and click "Open".The drop-down list will now show as "Microsoft Visual Studio 2013" so close the Preferences window and the next time you open a script in Unity, then it will open in Visual Studio 2013.


Saturday, 30 November 2013

Notes on Terrain Sculpting in Unity

So a couple of weeks ago I watched the Terrain Sculpting video tutorial from Unity, which you can view here:

http://unity3d.com/learn/tutorials/modules/beginner/live-training-archive/terrain-sculpting

But one of the questions I had was: what if you want to sculpt valleys, etc., using a height map?

To be able to sculpt valleys and troughs within Unity you have to Flatten your terrain. It sounds odd, I know, but in the tutorial you set a height greater than 0 and hit Flatten. This raises your terrain to the height you specified and allows you to cut into your terrain.

To Flatten your terrain, select it, then click on the "Paint Height" button in the Inspector. You will see the Flatten button in the Brush Settings (highlighted in red below) and you can either use the slider or type right into the box. Once you have your desired height set, then click "Flatten".


If you click the "Raise/Lower Height" button you can hold the Shift key while painting and you will cut into your Terrain.

But what if you want to use a Height Map? Well you can. Flatten your image and then click on the Settings button (illustrated below).


 Then click "Import Raw" under Height Map.

 
Choose your file and your height map will be applied. I created my Height Map in Photoshop and it looks like this:


The gray colour is: R: 176, G: 176, B: 176.

The black is: R:36, G: 36, B: 36
The texture was created in 8-bit grayscale and was saved in .RAW format.
My Terrain was 2000 x 2000 pixels, so that's how big I made the canvas.

When applied to the terrain, it looks like this:


Friday, 22 November 2013

A bit or an update...... or ......... "I love it when a plan comes together"

General Blurb!
Well it's been a bit quiet here on the Blog for a while. I've been getting to grips with Twitter so most of the updates have been going on there. Twitter is great at providing just a short update until I get the time to sit down and write everything out in Blog format. So, if you want more up-to-date news, then you can either Follow us on Twitter, or Like our Page on Facebook (the Twitter updates go to our Facebook page). If I had the time to sit down and work out if the Twitter feed could also go to our Google+ page, then I'd do that as well, but to be blunt: I'd rather spend my time on developing the game.

The Game
Yes, a game decision was made and I'm really excited about it! It's a survival horror game... and that's all I can say at the moment. Oh, I can say that a prototype is being developed!

Wii U
Kirkley Entertainment Inc. is now a registered Nintendo developer! Yay! That was very exciting! :D
We signed up for the Deferred Payment plan and got our Wii U Developer Kit. It was a bit of a process to receive the Dev. Kit as it got held up at border control because we didn't have an International Import number. Fortunately it was only a quick call to sort that out.
I did have an error when trying to run something on it, but the forums were a great place to get help. I managed to get up and running and had the Unity Angry Bots demo running on the Dev. Kit.

Unity
If you haven't guessed by now, Unity was chosen as the development engine going forward. I learnt a lot about it at the Unite Training Day as well as at Unite itself. You get a special Wii U version of Unity Pro when you become a Nintendo developer, so that was a bonus. Add in that Unity is compatible with PS 3 & 4 + Vita, Xbox 360 & One, Windows, Linux, Android and Apple OS's, then it makes it a one-stop shop for games development.

The Unity Asset Store
In order to develop the prototype as quickly as possible I decided to buy assets from the Unity Asset Store. Taking out the modelling component for characters (plus some great sales on the Asset Store) means I can just concentrate on developing the prototype and getting to rips with Unity and the Wii U Dev. Kit.

Unity Tutorials
Everyone needs to learn how to do stuff. Even if you've worked with a game engine before, or built one yourself, you still need to learn anything new. The Unity Tutorials have been great, and I'm especially getting a lot out of the Live Training Sessions, which are archived here:

http://unity3d.com/learn/live-training/archive

Other Tools
As a Unite attendee I got a great offer on a product called iClone. I got a bundle which included 3DExchange, the Mocap Device Platform (which allows you to use a Kinect to capture motion so you can animate in iClone) as well as training DVDs. Very handy and a great price.
Today I managed to create a custom animation in iClone and then export it using 3DExchange. Then I imported it into Unity and watched my animation play. The tutorial I followed is here:

http://www.gamasutra.com/blogs/MDMcCallum/20130926/201111/iClone_to_Unity_Tutorial.php

I also subscribed to the Adobe Creative Cloud so I can use Photoshop to create Height Maps for Unity, as well as for texture editing.

Then there's the Autodesk Entertainment Creation Suite, and Maya LT that I've been playing with. I haven't done much with these tools as I have been getting content from the Unity Asset Store.

We also got accepted for BizSpark, hence the logo on our site, which means we get awesome tools like Visual Studio 2013 Ultimate. I think that means we'll have to invest in a copy of UnityVS to take full advantage of that toolset.

Other Stuff
We put a legal firm on retainer, though that retainer was eaten up by getting them to go over our incorporation documents to make sure everything was in set up correctly, and then creating a Corporate Minute Book. The lawyer I'm working with specialises in the Technology field and Intellectual Property, so this is great!

And so it goes..
Now that the game has been selected, the engine has been selected, and the content creation tools selected work can really start to progress on the game. I'm hoping that the prototyping goes well and a basic prototype is available some time in 2014. Once that prototype is running, then I'm considering a Kickstarter campaign so I can raise some money to hire staff and really get going on this game.
I'm really excited in the progress that has been made recently, and the future is starting to look bright, so get out your shades! :)

Friday, 30 August 2013

Unite 2013 Training Day

While Day #1 of Unite 2013 kicked off yesterday in Vancouver, Tuesday was the Training Day and it was fantastic! The session was run by two of the guys from the Learn team: Ben Pitt & Will Goldstone. To start you off you were handed a nice 8GB USB key (with the Unity logo on it) that contained the installers for Unity 4.2 (required for the Training Day, which was nice as I had 4.1.5 installed) and then all the content needed to follow along with the tutorial and create a game.

There was A LOT of content covered in the course, so I apologize of parts of this post are vague.

The session started off with an introduction to the Unity Editor which took you through all the components of the Editor and customization options such as changing the colour of the Editor when in Play mode.To do this, follow these steps: 

1. Launch Unity then click on "Edit > Preferences".

2. Click on the "Colors" tab on the left-hand side and you will see the "Playmode tint" option under the "General" heading.


3. Click on the colour bar (in green above) and you will be presented with the colour picker. You can either pick your colour, or type in the RGB code.


4. Once done, click the "X" in the top right hand corner of the box, then click the "Play" button in the Editor to check your change.


After the Editor Refresher came some instruction on Adding Assets and then Level Prototyping. The Level Prototyping took us through how to quickly build up some floor spaces and using the Duplicate tools.The floor space we laid out was the start of a castle that was the game play area for what we were creating.

Then it was on to Editor Scripting. A handy script surrounded the floor with the provided walls and towers and we were good to go. Below is a screenshot of the finished castle that was provided.


Another handy part of the training was that the team provided us with pre-built scenes so if anything went horribly wrong, or we were struggling to keep up, then we could just load the relevant scene.

Once the walls were created we moved on to lighting and using sky boxes before a break.

The session started again with physics and creating a basic 3D capsule that was used as the basis for our main character, with some controls added. Boxes were added to the scene, and also had physics applied so that the player could knock them over.

After this came cameras and we attached a camera to the model to follow around the player. This camera was later replace by a more advance camera that chased the player and had collision detection so that it would avoid walls, etc.

Then we made some Coin objects that the player could pick up, and prefabs were introduced to take care of this. Then a basic GUI was created to display the amount o coins remaining to be collected. The coin collection was then expanded upon by creating a particle effect that would display once the coin was collected.


Once this was complete it was time for lunch!

We returned to talk about Character Animation and the (now integrated) Mecanim features were shown off. It was amazing to see that animations could be imported into Unity, and then applied to models. This is a great time-saver as you do not have to create the same animations on all your characters when you create them, but just import the animation into Unity and then apply the one animation to all your characters. This is backed by State Machines so you can state which animations feed into each other.


You can also layer in animations so that if you want a player to be able to complete 2 actions at one (for example: run and throw) then you can layer the 2 animations so that they can still play at the same time. You do this by selecting which parts of the character you want to exclude from the animation, for example: if you are using a throw animation (like we did) then you will layer the throw action over whatever other animation is playing, but to display both the animations then you would only want to display the parts of the body that are affected by the throw action, such as the head, torso and the arm that is doing the throwing.


Here's more on animation.

Oh, and there's also Blend Trees for animation too!

To complete the animation portion we replaced our sphere with the Ethan character that was provided (this was simple to do) and then apply the animations.


After that it was the introduction of Hazards. The ability to tag components in Unity really comes handy here as you can script your character so that if they come in contact with anything tagged "Hazard" then the character will die. So we added this script and added in a call to the Die animation, then respawn the player.

Then it was on to Enemies and Projectiles and we were done! Phew! As I wrote earlier, it was a LOT of content. There were no hold-ups as everyone in the room kept up (there were also multiple "helpers" around the floor to help people out where needed), but the instructors were rushed to get us finished in time.

We were given a link to the training slides, I wasn't told we couldn't give out that link so here it is! I apologize to the Unity team if we weren't supposed to share it, but let me know and I'll take down the link. Also, for readers I cannot say how long the content will be available.


Sunday, 24 March 2013

Unite 2013

Unite is the name for the Unity convention that usually happens in Europe every year, but this year is different as the Unite conference goes on a world tour! The tour hits up the following locations:

Canada (Vancouver)
Japan
China
Korea
Nordic
Columbia
Brazil

I've got tickets to the Vancouver Unite so I'm pretty excited. The conference is prefaced by a Training Day which teaches you the essentials of Unity.

To learn more about Unite 2013, click here.

Tuesday, 8 January 2013

War of the engines

So I've started looking into game engines to see which one is the best one for our needs. The 3 I've been looking at are:

UDK
CryEngine
Unity 4

I've played with a couple of versions of UDK and Unity, but CryEngine is new to me. Examples of UDK and CryEngine in games are easy enough to get a hold of (any Unreal Tournament game or the Batman Arkham series for UDK, and Far Cry and Crysis for CryEngine). Both engines are beautiful to look at and have a pile of features and both are the full version of the engine. UDK for professional game development studios like Rock Steady Studios (the Batman Arkham series developers) is at version 4, while the free UDK is version 3.

The CryEngine is so pretty :) This is the default level when you run CryLauncher


Unfortunately Unity is an up-and-coming engine so there aren't examples of AAA titles that have built using it. Version 4 has just been released and the way it handles animation is fantastic. You can create your animations in Unity and then map them to your 3D characters, etc. The beauty of this is that you are reproducing the same animations for each of your 3D characters in your 3D modelling tool, and them importing them: you are creating them in once place and applying them to the characters you need. Cool, right? Also, check out The Butterfly Effect demo reel and you'll know that Unity really is up-and-coming.

Unity 4 running the Angry Bots demo. The demo game plays right in the editor so no need to launch a separate utility like the examples for UDK and CryEngine.


I'm trying to dig up a full list of features so I can compare the 3 (I had heard that Unity 3.x did not have cloth or rag-doll physics support so it'll be nice to find out if Unity 4 addresses this), but all I've come across so far (and I haven't looked too deep yet) are just the sales level feature list rather than a full technical list. As soon as I get that comparison, I will post it here.

Unreal Development Kit looks good too. The default level when you run UDK Game.


If you want to know more about the engines mentioned above, then use the following links:

Unity 4
http://www.unity3d.com

CryEngine 3
http://mycryengine.com/

UDK 3
http://www.unrealengine.com/en/udk/

The good news is that all 3 engines are free to download, so you can download them and learn all about them without having to hand over a penny! Once you reach the stage where you are ready to deploy a game to market, then you'll have to look at paying the engine owners.

Side rant: it would be nice if 3D engine companies would do the same thing (let you use their software for free until you actual release something with it). I don't know about you, but a 30-day trial of 3DS Max is not enough to learn a product, and $3,675 is a steep price to pay for software!! Think I'm going to have to decide between Blender or Daz3D as they are both free. However, I think I still have the installers for TrueSpace and GameSpace that were awesome products from Caligari ... *sigh*